STscript 语言参考
什么是 STscript?
这是一个简单但功能强大的脚本语言,可用于在不需要严格编程的情况下扩展 SillyTavern 的功能,允许您:
- 创建迷你游戏或速通挑战
- 构建 AI 驱动的聊天洞察
- 释放您的创造力并与他人分享
STscript 是基于斜杠命令引擎构建的,利用命令批处理、数据管道、宏和变量。 这些概念将在以下文档中详细描述。
安全注意事项
能力越大,责任越大。在执行脚本之前,请务必仔细检查。
Hello, World!
要运行您的第一个脚本,打开任何 SillyTavern 聊天并在聊天输入栏中输入以下内容:
/pass Hello, World! | /echo |
|---|
您应该会在屏幕顶部看到一条提示消息。现在让我们逐步分析。
脚本是一批命令,每个命令都以斜杠开头,可以带有或不带有命名和未命名参数,并以命令分隔符结束:|。
命令按顺序依次执行,并在彼此之间传输数据。
/pass命令接受一个常量值 "Hello, World!" 作为未命名参数并将其写入管道。/echo命令通过管道从前一个命令接收值并将其显示为提示通知。
提示: 要查看所有可用命令的列表,请在聊天中输入
/help slash。
由于常量未命名参数和管道是可互换的,我们可以简单地将这个脚本重写为:
/echo Hello, World!用户输入
现在让我们为脚本添加一些交互性。我们将接受用户的输入值并在通知中显示它。
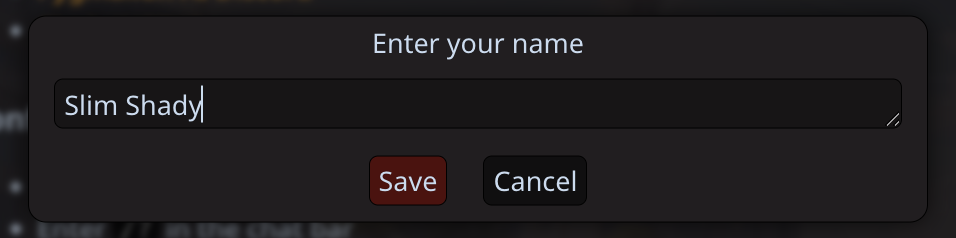
/input Enter your name |
/echo Hello, my name is {{pipe}}/input命令用于显示一个输入框,其中包含未命名参数中指定的提示,然后将输出写入管道。- 因为
/echo已经有一个设置输出模板的未命名参数,我们使用{{pipe}}宏来指定管道值将被渲染的位置。
 |
 |
|---|
其他输入/输出命令
/popup (text)— 显示一个阻塞弹出窗口,支持简单的 HTML 格式,例如:/popup <font color=red>I'm red!</font>。/setinput (text)— 用提供的文本替换用户输入栏的内容。/speak voice="name" (text)— 使用选定的 TTS 引擎和语音映射中的角色名称朗读文本,例如/speak name="Donald Duck" Quack!。/buttons labels=["a","b"] (text)— 显示一个带有指定文本和按钮标签的阻塞弹出窗口。labels必须是 JSON 序列化的字符串数组或包含此类数组的变量名。将点击的按钮标签返回到管道中,如果取消则返回空字符串。文本支持简单的 HTML 格式。
/popup 和 /input 的参数
/popup 和 /input 支持以下附加命名参数:
large=on/off- 增加弹出窗口的垂直大小。默认:off。wide=on/off- 增加弹出窗口的水平大小。默认:off。okButton=string- 添加自定义"确定"按钮文本的功能。默认:Ok。rows=number- (仅用于/input) 增加输入控件的大小。默认:1。
示例:
/popup large=on wide=on okButton="Accept" Please accept our terms and conditions..../echo 的参数
/echo 支持以下 severity 附加参数值,用于设置显示消息的样式。
warningerrorinfo(默认)success
示例:
/echo severity=error Something really bad happened.变量
变量用于在脚本中存储和操作数据,可以使用命令或宏。变量可以是以下类型之一:
- 本地变量 — 保存到当前聊天的元数据中,对其唯一。
- 全局变量 — 保存到 settings.json 中,在整个应用程序中都存在。
/getvar name或{{getvar\:\:name}}— 获取本地变量的值。/setvar key=name value或{{setvar::name::value}}— 设置本地变量的值。/addvar key=name increment或{{addvar::name::increment}}— 将increment添加到本地变量的值中。/incvar name或{{incvar::name}}— 将本地变量的值增加 1。/decvar name或{{decvar::name}}— 将本地变量的值减少 1。/getglobalvar name或{{getglobalvar::name}}— 获取全局变量的值。/setglobalvar key=name或{{setglobalvar::name::value}}— 设置全局变量的值。/addglobalvar key=name或{{addglobalvar::name:increment}}— 将increment添加到全局变量的值中。/incglobalvar name或{{incglobalvar::name}}— 将全局变量的值增加 1。/decglobalvar name或{{decglobalvar::name}}— 将全局变量的值减少 1。/flushvar name— 删除本地变量的值。/flushglobalvar name— 删除全局变量的值。
- 之前未定义的变量的默认值是空字符串,或者如果首次在
/addvar、/incvar、/decvar命令中使用,则为零。 /addvar命令中的增量如果增量和变量值都可以转换为数字,则执行加法或减法,否则执行字符串连接。- 如果命令参数接受变量名,并且同名的本地和全局变量都存在,则本地变量优先。
- 所有用于变量操作的斜杠命令都将结果值写入管道供下一个命令使用。
- 对于宏,只有 "get"、"inc" 和 "dec" 类型的宏返回值,"add" 和 "set" 则替换为空字符串。
现在,让我们考虑以下示例:
/input What do you want to generate? |
/setvar key=SDinput |
/echo Requesting an image of {{getvar::SDinput}} |
/getvar SDinput |
/imagine- 用户输入的值保存在名为
SDinput的本地变量中。 getvar宏用于在/echo命令中显示值。getvar命令用于检索变量的值并通过管道传递。- 该值传递给
/imagine命令(由图像生成插件提供)作为其输入提示。
由于变量在脚本执行之间保存且不会被清除,您可以在其他脚本中和通过宏引用该变量,它将解析为与示例脚本执行期间相同的值。要确保值被丢弃,请在脚本中添加 /flushvar 命令。
数组和对象
变量值可以包含 JSON 序列化的数组或键值对(对象)。
示例:
- 数组:
["apple","banana","orange"] - 对象:
{"fruits":["apple","banana","orange"]}
以下修改可以应用于命令以处理这些变量:
/len命令获取数组中的项目数。index=number/string命名参数可以添加到/getvar或/setvar及其全局对应项,以通过数组的从零开始的索引或对象的字符串键获取或设置子值。- 如果在不存在的变量上使用数字索引,该变量将被创建为空数组
[]。 - 如果在不存在的变量上使用字符串索引,该变量将被创建为空对象
{}。
- 如果在不存在的变量上使用数字索引,该变量将被创建为空数组
/addvar和/addglobalvar命令支持将新值推送到数组类型的变量。
流程控制 - 条件语句
您可以使用 /if 命令创建基于定义规则分支执行的条件表达式。
/if left=valueA right=valueB rule=comparison else="(command on false)" "(command on true)"
让我们看看以下示例:
/input What's your favorite drink? |
/if left={{pipe}} right="black tea" rule=eq else="/echo You shall not pass \| /abort" "/echo Welcome to the club, \{\{user\}\}"
这个脚本根据用户输入评估所需值,并根据输入值显示不同的消息。
/if 的参数
left是第一个操作数。让我们称之为 A。right是第二个操作数。让我们称之为 B。rule是要应用于操作数的操作。else是可选的子命令字符串,如果布尔比较结果为 false 则执行。- 未命名参数是如果布尔比较结果为 true 则执行的子命令。
操作数值按以下顺序评估:
- 数字字面量
- 本地变量名
- 全局变量名
- 字符串字面量
命名参数的字符串值可以用引号转义以允许多词字符串。然后丢弃引号。
布尔运算
支持以下布尔比较规则。应用于操作数的操作结果为 true 或 false 值。
eq(等于)=> A = Bneq(不等于)=> A != Blt(小于)=> A < Bgt(大于)=> A > Blte(小于或等于)=> A <= Bgte(大于或等于)=> A >= Bnot(一元否定)=> !Ain(包含子字符串)=> A 包含 B,不区分大小写nin(不包含子字符串)=> A 不包含 B,不区分大小写
子命令
子命令是包含要执行的斜杠命令列表的字符串。
- 要在子命令中使用命令批处理,命令分隔符字符应该被转义(见下文)。
- 由于宏值在进入条件时执行,而不是在执行子命令时执行,因此可以额外转义宏以延迟其评估到子命令执行时间。
- 子命令执行的结果通过管道传递给
/if之后的命令。 - 遇到
/abort命令时中断脚本执行。
/if 命令可以用作三元运算符。
以下示例将在变量 a 等于 5 时将 "true" 字符串传递给下一个命令,否则传递 "false" 字符串。
/if left=a right=5 rule=eq else="/pass false" "/pass true" |
/echo
转义序列
宏
宏的转义工作方式与以前一样。但是,使用闭包时,您需要转义宏的频率会大大降低。可以转义两个开始的大括号,或者同时转义开始和结束的大括号对。
/echo \{\{char}} |
/echo \{\{char\}\}
管道
在闭包中不需要转义管道(当用作命令分隔符时)。在任何想要使用字面管道字符而不是命令分隔符的地方,都需要转义它。
/echo title="a\|b" c\|d |
/echo title=a\|b c\|d |
使用解析器标志 STRICT_ESCAPING 时,不需要在引用值中转义管道。
/parser-flag STRICT_ESCAPING |
/echo title="a|b" c\|d |
/echo title=a\|b c\|d |
引号
要在引号值内使用字面引号字符,必须转义该字符。
/echo title="a \"b\" c" d "e" f空格
要在命名参数的值中使用空格,您必须用引号括起该值,或者转义空格字符。
/echo title="a b" c d |
/echo title=a\ b c d
闭包分隔符
如果要使用用于标记闭包开始或结束的字符组合,必须使用单个反斜杠转义该序列。
/echo \{: |
/echo \:}
管道中断符
||要防止前一个命令的输出自动注入到下一个命令的未命名参数中,请在两个命令之间放置双管道符。
/echo we don't want to pass this on ||
/world
闭包
{: ... :}闭包(块语句、lambda、匿名函数,随你怎么称呼)是包装在 {: 和 :} 之间的一系列命令,只有在执行到代码的该部分时才会被评估。
子命令
闭包使子命令的使用变得更加容易,并且不再需要转义管道符和宏。
// if without closures |
/if left=1 rule=eq right=1
    else="
        /echo not equal \|
        /return 0
    "
    /echo equal \|
/return \{\{pipe}}// if with closures |
/if left=1 rule=eq right=1
else={:
/echo not equal |
/return 0
:}
{:
/echo equal |
/return {{pipe}}
:}作用域
闭包有自己的作用域并支持作用域变量。作用域变量使用 /let 声明,使用 /var 设置和检索其值。获取作用域变量的另一种方法是使用 {{var::}} 宏。
/let x |
/let y 2 |
/var x 1 |
/var y |
/echo x is {{var::x}} and y is {{pipe}}.
在闭包内,您可以访问在同一闭包或其祖先之一中声明的所有变量。您无法访问在闭包的后代中声明的变量。 如果声明了与在闭包的祖先之一中声明的变量同名的变量,则在此闭包及其后代中无法访问祖先变量。
/let x this is root x |
/let y this is root y |
/return {:
    /echo called from level-1: x is "{{var::x}}" and y is "{{var::y}}" |
    /delay 500 |
    /let x this is level-1 x |
    /echo called from level-1: x is "{{var::x}}" and y is "{{var::y}}" |
    /delay 500 |
    /return {:
        /echo called from level-2: x is "{{var::x}}" and y is "{{var::y}}" |
        /let x this is level-2 x |
        /echo called from level-2: x is "{{var::x}}" and y is "{{var::y}}" |
        /delay 500
    :}()
:}() |
/echo called from root: x is "{{var::x}}" and y is "{{var::y}}"
命名闭包
/let x {: ... :} | /:x闭包可以分配给变量(仅作用域变量),以便稍后调用或用作子命令。
/let myClosure {:
    /echo this is my closure
:} |
/:myClosure/let myClosure {:
/echo this is my closure |
/delay 500
:} |
/times 3 {{var::myClosure}}/: 也可用于执行快速回复,因为它只是 /run 的简写。
/:QrSetName.QrButtonLabel |
/run QrSetName.QrButtonLabel
闭包参数
命名闭包可以接受命名参数,就像斜杠命令一样。参数可以有默认值。
/let myClosure {: a=1 b=
    /echo a is {{var::a}} and b is {{var::b}}
:} |
/:myClosure b=10
闭包和管道参数
父闭包的管道值不会自动注入到子闭包的第一个命令中。
您仍然可以使用 {{pipe}} 显式引用父闭包的管道值,但如果将闭包内第一个命令的未命名参数留空,该值将不会被自动注入。
/* This used to attempt to change the model to "foo"
   because the value "foo" from the /echo outside of
   the loop was injected into the /model command
   inside of the loop.
   Now it will simply echo the current model without
   attempting to change it.
*|
/echo foo |
/times 2 {:
	/model |
	/echo |
:} |/* You can still recreate the old behavior by
explicitly using the {{pipe}} macro.
*|
/echo foo |
/times 2 {:
/model {{pipe}} |
/echo |
:} |立即执行的闭包
{: ... :}()闭包可以立即执行,这意味着它们将被替换为其返回值。这在没有明确支持闭包的地方很有用,并且可以缩短一些否则需要大量中间变量的命令。
// a simple length comparison of two strings without closures |
/len foo |
/var lenOfFoo {{pipe}} |
/len bar |
/var lenOfBar {{pipe}} |
/if left={{var::lenOfFoo}} rule=eq right={{var:lenOfBar}} /echo yay!// the same comparison with immediately executed closures |
/if left={:/len foo:}() rule=eq right={:/len bar:}() /echo yay!除了运行保存在作用域变量中的命名闭包外,/run 命令还可用于立即执行闭包。
/run {:
	/add 1 2 3 4 |
:} |
/echo |
注释
// ... | /# ...注释是脚本代码中人类可读的解释或标注。注释不会中断管道。
// this is a comment |
/echo foo |
/# this is also a comment
块注释
块注释可用于快速注释掉多个命令。它们不会在管道符处终止。
/echo foo |
/*
/echo bar |
/echo foobar |
*|
/echo foo again |
流程控制
循环:/while 和 /times
如果需要在循环中运行某些命令直到满足特定条件,请使用 /while 命令。
/while left=valueA right=valueB rule=operation guard=on "commands"在循环的每一步中,它会将变量 A 的值与变量 B 的值进行比较,如果条件为真,则执行引号中的任何有效斜杠命令,否则退出循环。此命令不会向输出管道写入任何内容。
/while 的参数
可用的布尔比较集、变量处理、字面值和子命令与 /if 命令相同。
可选的 guard 命名参数(默认为 on)用于防止无限循环,将迭代次数限制为 100 次。
要禁用并允许无限循环,请设置 guard=off。
此示例将 i 的值加 1 直到达到 10,然后输出结果值(在这种情况下为 10)。
/setvar key=i 0 |
/while left=i right=10 rule=lt "/addvar key=i 1" |
/echo {{getvar::i}} |
/flushvar i
/times 的参数
运行子命令指定的次数。
/times (repeats) "(command)" — 引号中的任何有效斜杠命令重复多次,例如 /setvar key=i 1 | /times 5 "/addvar key=i 1" 将 "i" 的值加 1 共 5 次。
- {{timesIndex}} 被替换为迭代编号(从零开始),例如
/times 4 "/echo {{timesIndex}}"回显数字 0 到 4。 - 循环默认限制为 100 次迭代,传递
guard=off以禁用。
跳出循环和闭包
/break |/break 命令可用于提前跳出循环(/while 或 /times)或闭包。/break 的未命名参数可用于传递与当前管道不同的值。
/break 目前在以下命令中实现:
/while- 提前退出循环/times- 提前退出循环/run(带闭包或通过变量的闭包)- 提前退出闭包/:(带闭包)- 提前退出闭包
/times 10 {:
	/echo {{timesIndex}}
	/delay 500 |
	/if left={{timesIndex}} rule=gt right=3 {:
		/break
	:} |
:} |/let x {: iterations=2
/if left={{var::iterations}} rule=gt right=10 {:
/break too many iterations! |
:} |
/times {{var::iterations}} {:
/delay 500 |
/echo {{timesIndex}} |
:} |
:} |
/:x iterations=30 |
/echo the final result is: {{pipe}}/run {:
/break 1 |
/pass 2 |
:} |
/echo pipe will be one: {{pipe}} |/let x {:
/break 1 |
/pass 2 |
:} |
/:x |
/echo pipe will be one: {{pipe}} |数学运算
- 以下所有运算都接受一系列数字或变量名,并将结果输出到管道。
- 无效运算(例如除以零)以及导致 NaN 值或无穷大的运算返回零。
- 乘法、加法、最小值和最大值接受无限数量的参数,用空格分隔。
- 减法、除法、指数运算和模运算接受用空格分隔的两个参数。
- 正弦、余弦、自然对数、平方根、绝对值和四舍五入接受一个参数。
运算列表:
/add (a b c d)— 对值集进行加法运算,例如/add 10 i 30 j/mul (a b c d)— 对值集进行乘法运算,例如/mul 10 i 30 j/max (a b c d)— 从值集中返回最大值,例如/max 1 0 4 k/min (a b c d)— 从值集中返回最小值,例如/min 5 4 i 2/sub (a b)— 对两个值进行减法运算,例如/sub i 5/div (a b)— 对两个值进行除法运算,例如/div 10 i/mod (a b)— 对两个值进行模运算,例如/mod i 2/pow (a b)— 对两个值进行幂运算,例如/pow i 2/sin (a)— 对值进行正弦运算,例如/sin i/cos (a)— 对值进行余弦运算,例如/cos i/log (a)— 对值进行自然对数运算,例如/log i/abs (a)— 对值进行绝对值运算,例如/abs -10/sqrt (a)— 对值进行平方根运算,例如/sqrt 9/round (a)— 对值进行四舍五入到最接近整数的运算,例如/round 3.14/rand (round=round|ceil|floor from=number=0 to=number=1)— 返回介于 from 和 to 之间的随机数,例如/rand或/rand 10或/rand from=5 to=10。范围是包含的。返回的值将包含小数部分。使用round命名参数获取整数值,例如/rand round=ceil向上舍入,round=floor向下舍入,round=round舍入到最接近的值。
示例 1:获取半径为 50 的圆的面积。
/setglobalvar key=PI 3.1415 |
/setvar key=r 50 |
/mul r r PI |
/round |
/echo Circle area: {{pipe}}
示例 2:计算 5 的阶乘。
/setvar key=input 5 |
/setvar key=i 1 |
/setvar key=product 1 |
/while left=i right=input rule=lte "/mul product i \| /setvar key=product \| /addvar key=i 1" |
/getvar product |
/echo Factorial of {{getvar::input}}: {{pipe}} |
/flushvar input |
/flushvar i |
/flushvar product
使用 LLM
脚本可以使用以下命令向当前连接的 LLM API 发出请求:
/gen (prompt)— 使用提供的提示词为所选角色生成文本,并包含聊天消息。/genraw (prompt)— 仅使用提供的提示词生成文本,忽略当前角色和聊天。/trigger— 触发正常生成(相当于单击"发送"按钮)。如果在群组聊天中,您可以选择提供基于 1 的群组成员索引或角色名称让他们回复,否则根据群组设置触发群组回合。
/gen 和 /genraw 的参数
/genraw lock=on/off stop=[] instruct=on/off (prompt)lock— 可以是on或off。指定在生成进行时是否应阻止用户输入。默认值:off。stop— JSON 序列化的字符串数组。仅为此生成添加自定义停止字符串(如果 API 支持)。默认值:无。instruct(仅/genraw)— 可以是on或off。允许在输入提示词上使用指令格式(如果启用了指令模式并且 API 支持)。设置为off以强制纯提示词。默认值:on。as(用于文本补全 API)— 可以是system(默认)或char。定义最后一行提示词的格式。char将使用角色名称,system将不使用或使用中性名称。
然后,生成的文本通过管道传递到下一个命令,并可以保存到变量或使用 I/O 功能显示:
/genraw Write a funny message from Cthulhu about taking over the world. Use emojis. |
/popup <h3>Cthulhu says:</h3><div>{{pipe}}</div> |
|---|
或将生成的消息作为角色的回应插入:
/genraw You have been memory wiped, your name is now Lisa and you're tearing me apart. You're tearing me apart Lisa! |
/sendas name={{char}} {{pipe}}
提示词注入
脚本可以添加自定义 LLM 提示词注入,使其本质上相当于无限的作者注释。
/inject (text)— 将任何文本插入到当前聊天的正常 LLM 提示词中,并需要唯一标识符。保存到聊天元数据。/listinjects— 在系统消息中显示脚本为当前聊天添加的所有提示词注入的列表。/flushinjects— 删除脚本为当前聊天添加的所有提示词注入。/note (text)— 设置当前聊天的作者注释值。保存到聊天元数据。/interval— 设置当前聊天的作者注释插入间隔。/depth— 设置聊天内位置的作者注释插入深度。/position— 设置当前聊天的作者注释位置。
/inject 的参数
/inject id=IdGoesHere position=chat depth=4 My prompt injectionid— 标识符字符串或对变量的引用。使用相同 ID 的/inject的后续调用将覆盖以前的文本注入。必需参数。position— 设置注入的位置。默认值:after。可能的值:after:在主提示词之后。before:在主提示词之前。chat:聊天内。
depth— 设置聊天内位置的注入深度。0 表示在最后一条消息之后插入,1 - 在最后一条消息之前,等等。默认值:4。- 未命名参数是要注入的文本。空字符串将取消设置所提供标识符的先前值。
访问聊天消息
读取消息
您可以使用 /messages 命令访问当前选定聊天中的消息。
/messages names=on/off start-finishnames参数用于指定是否要包含角色名称,默认值:on。- 在未命名参数中,它接受
start-finish格式的消息索引或范围。范围是包含的! - 如果范围无法满足,即请求的索引无效或消息数量超过存在的消息数量,则返回空字符串。
- 从提示词中隐藏的消息(由幽灵图标表示)将从输出中排除。
- 如果您想知道最新消息的索引,请使用
{{lastMessageId}}宏,{{lastMessage}}将为您获取消息本身。
要计算范围的起始索引,例如,当您需要获取最后 N 条消息时,请使用变量减法。 此示例将为您获取聊天中的最后 3 条消息:
/setvar key=start {{lastMessageId}} |
/addvar key=start -2 |
/messages names=off {{getvar::start}}-{{lastMessageId}} |
/setinput
发送消息
脚本可以以用户、角色、人设、中立叙述者的身份发送消息,或添加注释。
/send (text)— 以当前选定的人设添加消息。/sendas name=charname (text)— 以任何角色添加消息,按其名称匹配。name参数是必需的。使用{{char}}宏以当前角色发送。/sys (text)— 添加来自中立叙述者的消息,该消息不属于用户或角色。显示的名称纯粹是装饰性的,可以使用/sysname命令自定义。/comment (text)— 添加在聊天中显示但对提示词不可见的隐藏注释。/addswipe (text)— 向最后一条角色消息添加滑动。无法向用户或隐藏消息添加滑动。/hide (message id or range)— 根据提供的消息索引或start-finish格式的包含范围从提示词中隐藏一条或多条消息。/unhide (message id or range)— 根据提供的消息索引或start-finish格式的包含范围将一条或多条消息返回到提示词。
/send、/sendas、/sys 和 /comment 命令可选择接受命名参数 at,其值为从零开始的数值(或包含此类值的变量名),用于指定消息插入的确切位置。默认情况下,新消息插入到聊天日志的末尾。
这将在对话历史的开头插入一条用户消息:
/send at=0 Hi, I use Linux.删除消息
这些命令具有潜在破坏性,并且没有"撤消"功能。如果您不小心删除了重要内容,请检查 /backups/ 文件夹。
/cut (message id or range)— 根据提供的消息索引或start-finish格式的包含范围从聊天中剪切一条或多条消息。/del (number)— 从聊天中删除最后 N 条消息。/delswipe (1-based swipe id)— 根据提供的基于 1 的滑动 ID 从最后一条角色消息中删除滑动。/delname (character name)— 删除当前聊天中属于具有指定名称的角色的所有消息。/delchat— 删除当前聊天。
World Info 命令
World Info(也称为 Lorebook)是一个高度实用的工具,用于动态地将数据插入提示词中。有关更详细的说明,请参阅专用页面:World Info。
/getchatbook— 获取聊天绑定的 World Info 文件的名称,如果未绑定则创建一个新文件,并将其传递到管道。/findentry file=bookName field=fieldName [text]— 使用字段值与提供的文本的模糊匹配从指定文件(或指向文件名的变量)中查找记录的 UID(默认字段:key),并将 UID 传递到管道,例如/findentry file=chatLore field=key Shadowfang。/getentryfield file=bookName field=field [UID]— 从指定的 World Info 文件(或指向文件名的变量)中获取具有 UID 的记录的字段值(默认字段:content),并将值传递到管道,例如/getentryfield file=chatLore field=content 123。/setentryfield file=bookName uid=UID field=field [text]— 从指定的 World Info 文件(或指向文件名的变量)中设置具有 UID(或指向 UID 的变量)的记录的字段值(默认字段:content)。要为关键字字段设置多个值,请使用逗号分隔的列表作为文本值,例如/setentryfield file=chatLore uid=123 field=key Shadowfang,sword,weapon。/createentry file=bookName key=keyValue [content text]— 在指定文件(或指向文件名的变量)中创建具有关键字和内容(这两个参数都是可选的)的新记录,并将 UID 传递到管道,例如/createentry file=chatLore key=Shadowfang The sword of the king。
有效的条目字段
逻辑值
- 0 = AND ANY(任一)
- 1 = NOT ALL(非全部)
- 2 = NOT ANY(非任一)
- 3 = AND ALL(全部)
位置值
- 0 = 在主提示词之前
- 1 = 在主提示词之后
- 2 = 作者注释顶部
- 3 = 作者注释底部
- 4 = 聊天内指定深度
- 5 = 示例消息顶部
- 6 = 示例消息底部
角色值(仅位置 = 4)
- 0 = 系统
- 1 = 用户
- 2 = 助手
示例 1:通过关键字从聊天 lorebook 中读取内容
/getchatbook | /setvar key=chatLore |
/findentry file={{getvar::chatLore}} field=key Shadowfang |
/getentryfield file={{getvar::chatLore}} field=key |
/echo
示例 2:创建带有关键字和内容的聊天 lorebook 条目
/getchatbook | /setvar key=chatLore |
/createentry file={{getvar::chatLore}} key="Milla" Milla Basset is a friend of Lilac and Carol. She is a hush basset puppy who possesses the power of alchemy. |
/echo
示例 3:使用聊天中的新信息扩展现有 lorebook 条目
/getchatbook | /setvar key=chatLore |
/findentry file={{getvar::chatLore}} field=key Milla |
/setvar key=millaUid |
/getentryfield file={{getvar::chatLore}} field=content |
/setvar key=millaContent |
/gen lock=on Tell me more about Milla Basset based on the provided conversation history. Incorporate existing information into your reply: {{getvar::millaContent}} |
/setvar key=millaContent |
/echo New content: {{pipe}} |
/setentryfield file={{getvar::chatLore}} uid=millaUid field=content {{getvar::millaContent}}
文本操作
有多种有用的文本操作实用命令可在各种脚本场景中使用。
/trimtokens— 从开始或结束处将输入修剪为指定数量的文本 token,并将结果输出到管道。/trimstart— 将输入修剪到第一个完整句子的开始,并将结果输出到管道。/trimend— 将输入修剪到最后一个完整句子的结束,并将结果输出到管道。/fuzzy— 对输入文本与字符串列表执行模糊匹配,将最佳字符串匹配输出到管道。/regex name=scriptName [text]— 为指定文本执行 Regex 扩展中的正则表达式脚本。脚本必须启用。
/trimtokens 的参数
/trimtokens limit=number direction=start/end (input)direction设置修剪方向,可以是start或end。默认值:end。limit设置输出中剩余的 token 数量。也可以指定包含数字的变量名。必需参数。- 未命名参数是要修剪的输入文本。
/fuzzy 的参数
/fuzzy list=["candidate1","candidate2"] (input)list是包含候选项的 JSON 序列化字符串数组。也可以指定包含列表的变量名。必需参数。- 未命名参数是要匹配的输入文本。输出是与输入最匹配的候选项之一。
自动完成
- 自动完成在聊天输入和大型快速回复编辑器中都已启用。
- 自动完成在您输入的任何地方都有效。即使使用多个管道命令和嵌套闭包也是如此。
- 自动完成支持三种查找匹配命令的方式(用户设置 -> STscript 匹配)。
- 开头匹配 "旧"方式。只有精确以键入值开头的命令才会显示。
- 包含匹配 所有包含键入值的命令都会显示。示例:输入
/delete时,命令/qr-delete和/qr-set-delete将显示在自动完成列表中(/qr-delete,/qr-set-delete)。 - 模糊匹配 所有可以与键入值进行模糊匹配的命令都会显示。示例:输入
/seas时,命令/sendas将显示在自动完成列表中(/sendas)。
- 自动完成也支持命令参数。列表将自动显示必需参数。对于可选参数,按 Ctrl+Space 打开可用选项列表。
- 输入
/:以执行闭包或 QR 时,自动完成将显示作用域变量和 QR 的列表。 - 自动完成对宏(在斜杠命令中)的支持有限。输入
{{以获取可用宏的列表。 - 使用向上和向下箭头键从自动完成选项列表中选择选项。
- 按 Enter 或 Tab 或单击选项以将选项放置在光标处。
- 按 Escape 关闭自动完成列表。
- 按 Ctrl+Space 打开自动完成列表或切换所选选项的详细信息。
解析器标志
/parser-flag解析器接受标志以修改其行为。这些标志可以在脚本中的任何时候打开和关闭,所有后续输入都将相应地进行评估。 您可以在用户设置中设置默认标志。
严格转义
/parser-flag STRICT_ESCAPING on |启用 STRICT_ESCAPING 后的更改如下。
管道符
引号值中的管道符不需要转义。
/echo title="a|b" c\|d反斜杠
符号前面的反斜杠可以被转义,以提供后跟功能符号的字面反斜杠。
// this will echo "foo \", then echo "bar" |
/echo foo \\|
/echo bar/echo \\|
/echo \\\|替换变量宏
/parser-flag REPLACE_GETVAR on |此标志有助于避免当变量值包含可以解释为宏的文本时的双重替换。{{var::}} 宏最后被替换,并且不会对生成的文本/变量值进行进一步的替换。
将所有 {{getvar::}} 和 {{getglobalvar::}} 宏替换为 {{var::}}。
在幕后,解析器将在带有替换宏的命令之前插入一系列命令执行器:
- 调用
/let将当前{{pipe}}保存到作用域变量 - 调用
/getvar或/getglobalvar获取宏中使用的变量 - 调用
/let将检索到的变量保存到作用域变量 - 使用保存的
{{pipe}}值调用/return以恢复下一个命令的正确管道值
// the following will echo the last message's id / number |
/setvar key=x \{\{lastMessageId}} |
/echo {{getvar::x}}// this will echo the literal text {{lastMessageId}} |
/parser-flag REPLACE_GETVAR |
/setvar key=x \{\{lastMessageId}} |
/echo {{getvar::x}}Quick Replies:脚本库和自动执行
Quick Replies 是 SillyTavern 的内置扩展,提供了一种简单的方法来存储和执行您的脚本。
配置 Quick Replies
要开始使用,请打开扩展面板(堆叠方块图标),然后展开 Quick Replies 菜单。
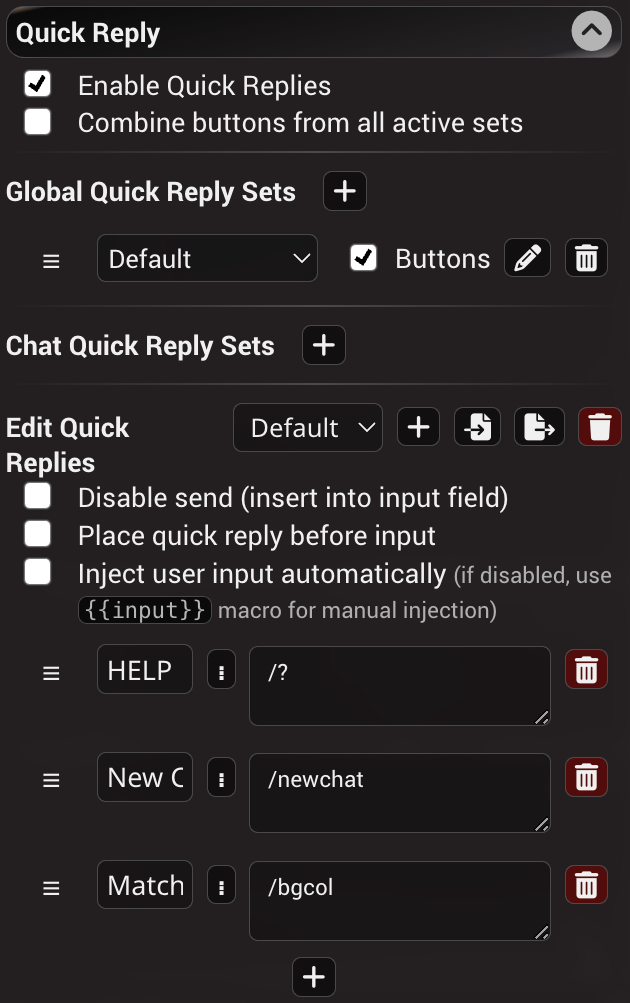
Quick Replies 默认是禁用的,您需要先启用它们。 然后您会看到聊天输入栏上方出现一个栏。
您可以设置显示的按钮文本标签(我们建议使用表情符号以保持简洁)以及单击按钮时将执行的脚本。
按钮数量由插槽数量设置控制(最大 = 100),根据您的需要进行调整,完成后单击"应用"。
自动注入用户输入在使用 STscript 时建议禁用,否则可能会干扰您的输入,请改用 {{input}} 宏在脚本中获取输入栏的当前值。
Quick Reply 预设允许多组预定义的 Quick Replies,并可以手动切换或使用 /qrset (预设名称) 命令切换。
在切换到不同的预设之前,不要忘记单击"更新"以将您的更改写入当前使用的预设!
手动执行
现在您可以将第一个脚本添加到库中。选择任何空闲插槽(或创建一个),在左侧框中输入"Click me"以设置标签,然后将以下内容粘贴到右侧框中:
/addvar key=clicks 1 |
/if left=clicks right=5 rule=eq else="/echo Keep going..." "/echo You did it!  \| /flushvar clicks"
然后在聊天栏上方出现的按钮上单击 5 次。
每次单击都会将变量 clicks 加 1,当值等于 5 时显示不同的消息并重置变量。
自动执行
通过单击已创建命令的 ⋮ 按钮打开模态菜单。
 |
|---|
在此菜单中,您可以执行以下操作:
- 在方便的全屏编辑器中编辑脚本
- 从聊天栏隐藏按钮,使其仅可用于自动执行。
- 在以下一个或多个条件下启用自动执行:
- 应用启动
- 向聊天发送用户消息
- 在聊天中接收 AI 消息
- 打开角色或群组聊天
- 触发群组成员的回复
- 使用相同的自动化 ID 激活 World Info 条目
- 为快速回复提供自定义工具提示(在 UI 中将鼠标悬停在快速回复上时显示的文本)
- 为测试目的执行脚本
只有在启用 Quick Replies 扩展时,命令才会自动执行。
例如,您可以通过添加以下脚本并将其设置为在用户消息上自动执行,在发送五条用户消息后显示一条消息。
/addvar key=usercounter 1 |
/echo You've sent {{pipe}} messages. |
/if left=usercounter right=5 rule=gte "/echo Game over! \| /flushvar usercounter"
调试器
扩展的 Quick Reply 编辑器中存在一个基本调试器。在脚本中的任何位置使用 /breakpoint | 设置断点。从 QR 编辑器执行脚本时,执行将在该点中断,允许您检查当前可用的变量、管道、命令参数等,并逐步执行其余代码。
/let x {: n=1
	/echo n is {{var::n}} |
	/mul n n |
:} |
/breakpoint |
/:x n=3 |
/echo result is {{pipe}} |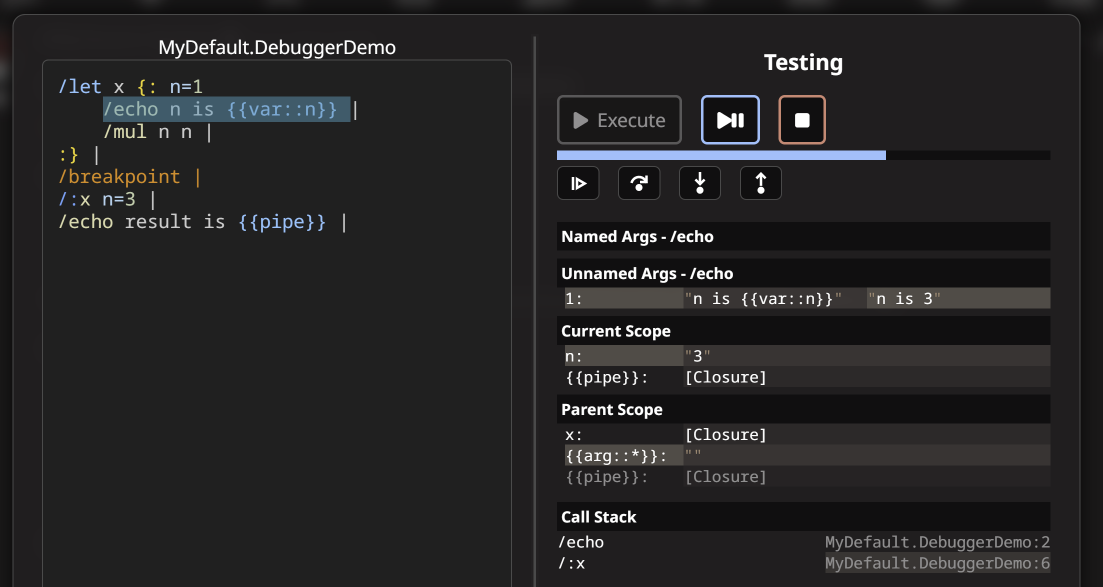 |
|---|
调用过程
/run 命令可以通过标签调用在 Quick Replies 中定义的脚本,基本上提供了定义过程并从中返回结果的能力。这允许拥有可重用的脚本块,其他脚本可以引用这些脚本块。过程的最后一个管道结果会传递给其后的下一个命令。
/run ScriptLabel让我们创建两个 Quick Replies:
标签:
GetRandom
命令:
/pass {{roll:d100}}标签:
GetMessage
命令:
/run GetRandom | /echo Your lucky number is: {{pipe}}单击 GetMessage 按钮将调用 GetRandom 过程,该过程将解析 {{roll}} 宏并将数字传递给调用者,向用户显示。
- 过程不接受命名或未命名参数,但可以引用与调用者相同的变量。
- 调用过程时避免递归,因为如果处理不当,可能会产生"调用堆栈超出"错误。
从不同的 Quick Reply 预设调用过程
您可以使用 a.b 语法从不同的快速回复预设调用过程,其中 a = QR 预设名称,b = QR 标签名称
/run QRpreset1.QRlabel1默认情况下,系统将首先查找快速回复标签 a.b,因此如果您的标签之一是字面上的 "QRpreset1.QRlabel1",它将尝试运行该标签。如果未找到此类标签,它将搜索名为 "QRpreset1" 的 QR 预设,其中包含标记为 "QRlabel1" 的 QR。
Quick Replies 管理命令
创建 Quick Reply
/qr-create (arguments, [message])– 创建新的 Quick Reply,示例:/qr-create set=MyPreset label=MyButton /echo 123
参数:
label- string - 按钮上的文本,例如label=MyButtonset- string - QR 集的名称,例如set=PresetName1hidden- bool - 按钮是否应隐藏,例如hidden=truestartup- bool - 在应用启动时自动执行,例如startup=trueuser- bool - 在用户消息时自动执行,例如user=truebot- bool - 在 AI 消息时自动执行,例如bot=trueload- bool - 在聊天加载时自动执行,例如load=truetitle- bool - 要在按钮上显示的标题/工具提示,例如title="My Fancy Button"
删除 Quick Reply
/qr-delete (set=string [label])– 删除 Quick Reply
更新 Quick Reply
/qr-update (arguments, [message])– 更新 Quick Reply,示例:/qr-update set=MyPreset label=MyButton newlabel=MyRenamedButton /echo 123
参数:
newlabel- string - 按钮的新文本,例如newlabel=MyRenamedButtonlabel- string - 按钮上的文本,例如label=MyButtonset- string - QR 集的名称,例如set=PresetName1hidden- bool - 按钮是否应隐藏,例如hidden=truestartup- bool - 在应用启动时自动执行,例如startup=trueuser- bool - 在用户消息时自动执行,例如user=truebot- bool - 在 AI 消息时自动执行,例如bot=trueload- bool - 在聊天加载时自动执行,例如load=truetitle- bool - 要在按钮上显示的标题/工具提示,例如title="My Fancy Button"
获取 Quick Reply
/qr-get- 检索 Quick Reply 的所有属性,示例:/qr-get set=myQrSet id=42
创建或更新 QR 预设
/qr-presetupdate (arguments [label])或/qr-presetadd (arguments [label])
参数:
enabled- bool - 启用或禁用预设nosend- bool - 禁用发送/插入到用户输入(对斜杠命令无效)before- bool - 将 QR 放置在用户输入之前slots- int - 插槽数量inject- bool - 自动注入用户输入(如果禁用,请使用{{input}})
创建新预设(覆盖现有预设),示例:/qr-presetadd slots=3 MyNewPreset
添加 QR 上下文菜单
/qr-contextadd (set=string label=string chain=bool [preset name])– 向 QR 添加上下文菜单预设,示例:/qr-contextadd set=MyPreset label=MyButton chain=true MyOtherPreset
删除所有上下文菜单
/qr-contextclear (set=string [label])– 从 QR 中删除所有上下文菜单预设,示例:/qr-contextclear set=MyPreset MyButton
删除一个上下文菜单
/qr-contextdel (set=string label=string [preset name])– 从 QR 中删除上下文菜单预设,示例:/qr-contextdel set=MyPreset label=MyButton MyOtherPreset
Quick Reply 值转义
在 QR 消息/命令中,|{} 可以用反斜杠转义。
例如,使用 /qr-create label=MyButton /getvar myvar \| /echo \{\{pipe\}\} 创建一个调用 /getvar myvar | /echo {{pipe}} 的 QR。
扩展命令
SillyTavern 扩展(内置、可下载和第三方)可以添加自己的斜杠命令。下面只是官方扩展功能的示例。该列表可能不完整,请确保检查 /help slash 以获取最完整的可用命令列表。
/websearch (query)— 在线搜索网页片段以查找指定查询,并将结果返回到管道中。由 Web Search 扩展提供。/imagine (prompt)— 使用提供的提示词生成图像。由 Image Generation 扩展提供。/emote (sprite)— 通过模糊匹配名称为活动角色设置精灵。由 Character Expressions 扩展提供。/costume (subfolder)— 为活动角色设置精灵集覆盖。由 Character Expressions 扩展提供。/music (name)— 按名称强制更改正在播放的背景音乐文件。由 Dynamic Audio 扩展提供。/ambient (name)— 按名称强制更改正在播放的环境声音文件。由 Dynamic Audio 扩展提供。/roll (dice formula)— 向聊天添加一条隐藏消息,其中包含骰子掷骰的结果。由 D&D Dice 扩展提供。
UI 交互
脚本还可以与 SillyTavern 的 UI 交互:在聊天之间导航或更改样式参数。
角色导航
/random— 打开与随机角色的聊天。/go (name)— 打开与指定名称角色的聊天。首先搜索精确名称匹配,然后按前缀,然后按子字符串。
UI 样式
/bubble— 将消息样式设置为"气泡聊天"样式。/flat— 将消息样式设置为"扁平聊天"样式。/single— 将消息样式设置为"单个文档"样式。/movingui (name)— 按名称激活 MovingUI 预设。/resetui— 将 MovingUI 面板状态重置为其原始位置。/panels— 切换 UI 面板的可见性:顶部栏、左侧和右侧抽屉。/bg (name)— 使用模糊名称匹配查找并设置背景。尊重聊天背景锁定状态。/lockbg— 锁定当前聊天的背景图像。/unlockbg— 解锁当前聊天的背景图像。
更多示例
生成聊天摘要(由 @IkariDevGIT 提供)
/setglobalvar key=summaryPrompt Summarize the most important facts and events that have happened in the chat given to you in the Input header. Limit the summary to 100 words or less. Your response should include nothing but the summary. |
/setvar key=tmp |
/messages 0-{{lastMessageId}} |
/trimtokens limit=3000 direction=end |
/setvar key=s1 |
/echo Generating, please wait... |
/genraw lock=on instruct=off {{instructInput}}{{newline}}{{getglobalvar::summaryPrompt}}{{newline}}{{newline}}{{instructInput}}{{newline}}{{getvar::s1}}{{newline}}{{newline}}{{instructOutput}}{{newline}}The chat summary:{{newline}} |
/setvar key=tmp |
/echo Done! |
/setinput {{getvar::tmp}} |
/flushvar tmp |
/flushvar s1
按钮弹出窗口用法
/setglobalvar key=genders ["boy", "girl", "other"] |
/buttons labels=genders Who are you? |
/echo You picked: {{pipe}}
获取第 N 个斐波那契数(使用 Binet 公式)
提示:将
fib_no的值设置为所需的数字
/setvar key=fib_no 5 |
/pow 5 0.5 | /setglobalvar key=SQRT5 |
/setglobalvar key=PHI 1.618033 |
/pow PHI fib_no | /div {{pipe}} SQRT5 |
/round |
/echo {{getvar::fib_no}}th Fibonacci's number is: {{pipe}}
递归阶乘(使用闭包)
/let fact {: n=
    /if left={{var::n}} rule=gt right=1
        else={:
            /return 1
        :}
        {:
            /sub {{var::n}} 1 |
            /:fact n={{pipe}} |
            /mul {{var::n}} {{pipe}}
        :}
:} |

/input Calculate factorial of: |
/let n {{pipe}} |
/:fact n={{var::n}} |
/echo factorial of {{var::n}} is {{pipe}}